
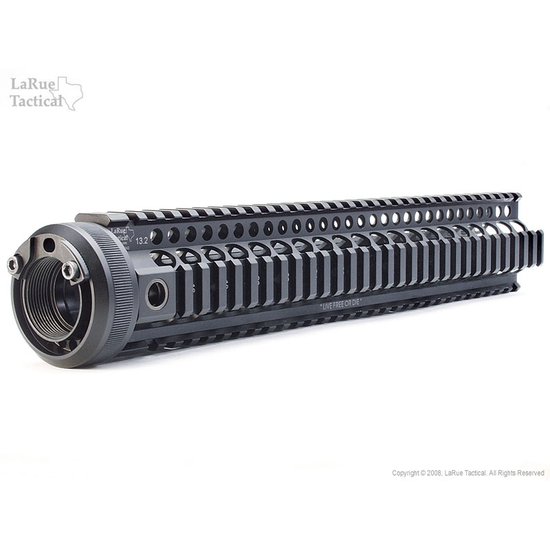


LaRue Quad Rail Handguard
link: https://www.larue.com/products/larue-quad-rail-handguard/
SKU: LT15
$0.00
LaRue Quad Rail Free-Floating Handguard with LaRue Locking System.
Comes complete with Allen wrench, vial of blue Locktite and Instructions.

LaRue Tactical 7.0" Handguard LT15-7
Ideal for a replacement for carbine-length rifles using standard front sight
bases. The 7.0's length stops just short of a carbine-length gas block,
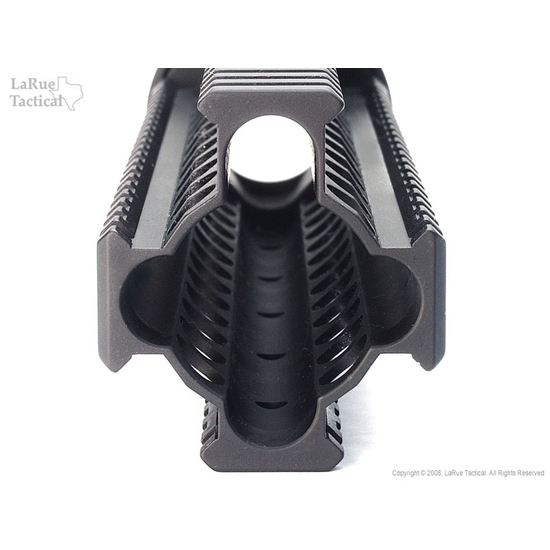
providing true free-float. Our two-pin proprietary barrel nut system with its
locking anti-slip plate, sets LaRue handguards apart from the competition. Once
properly installed, there is no chance of movement whatsoever. The side and
bottom rails are tucked closer to the barrel, keeping the profile narrower and
more streamlined. LaRue handguards also include integral QD sling-swivel sockets
at the base of each side for convenient mounting 2-point slings. Additionally,
our Free-float Rail system provides an excellent heat-sinking feature that pulls
throat-damaging heat away from the chamber area. Another heat-sinking benefit is
the elimination of pressure-spikes, which some feel is the cause of a large part
of pre-mature bolt failures.
Weight: .742 lb
LaRue Tactical 9.0" Handguard LT15-9
Excellent choice for short rifles in the 10"-16" range. The 9.0's length stops
just past a carbine-length gas block, providing true free-float. Our two-pin
proprietary barrel nut system with its locking anti-slip plate, sets LaRue
handguards apart from the competition. Once properly installed, there is no
chance of movement whatsoever. The side and bottom rails are tucked closer to
the barrel, keeping the profile narrower and more streamlined. LaRue handguards
also include integral QD sling-swivel sockets at the base of each side for
convenient mounting 2-point slings. Additionally, our Free-float Rail system
provides an excellent heat-sinking feature that pulls throat-damaging heat away
from the chamber area. Another heat-sinking benefit is the elimination of
pressure-spikes, which some feel is the cause of a large part of pre-mature bolt
failures.
Weight: .854lb
LaRue Tactical 10" Handguard LT15-10
Ideal for carbine-length rifles in the 11.5 to 16" range. The 10.0's length
stops about an inch past of a carbine-length gas block, providing true
free-float. Our two-pin proprietary barrel nut system with its locking anti-slip
plate, sets LaRue handguards apart from the competition. Once properly
installed, there is no chance of movement whatsoever. The side and bottom rails
are tucked closer to the barrel, keeping the profile narrower and more
streamlined. LaRue handguards also include integral QD sling-swivel sockets at
the base of each side for convenient mounting 2-point slings. Additionally, our
Free-float Rail system provides an excellent heat-sinking feature that pulls
throat-damaging heat away from the chamber area. Another heat-sinking benefit is
the elimination of pressure-spikes, which some feel is the cause of a large part
of pre-mature bolt failures.
Weight: .92lb
LaRue Tactical 11" Handguard LT15-11FL
Ideal for rifles in the 16" range. The 11.0's length stops just past mid-length
gas blocks providing true free-float. Our two-pin proprietary barrel nut system
with its locking anti-slip plate, sets LaRue handguards apart from the
competition. Once properly installed, there is no chance of movement whatsoever.
The side and bottom rails are tucked closer to the barrel, keeping the profile
narrower and more streamlined. LaRue handguards also include integral QD
sling-swivel sockets at the base of each side for convenient mounting 2-point
slings. Additionally, our Free-float Rail system provides an excellent
heat-sinking feature that pulls throat-damaging heat away from the chamber area.
Another heat-sinking benefit is the elimination of pressure-spikes, which some
feel is the cause of a large part of pre-mature bolt failures. Note: Max
clearance inside the handguard is 1.15". Any gas block that has a diameter
larger than 1.15" will not fit in the handguard. The gas tube port on the gas
block is not a factor in clearance.
Weight: .992lb
LaRue Tactical 11" Handguard SBRS (Gooseneck) LT15-11
Developed to accommodate more upper rail-space over 10.5" to 12" barrels, while
still providing access to special flash hiders and silencers under 1.25" in
diameter. This is the only rail that allows the proper placement of Aimpoint M2,
PEQ-2A and front flip-up sight over a 10.5" barrel. The side and bottom rails
cover carbine-length gas blocks, and provide true free-float. Our two-pin
proprietary barrel nut system with its locking anti-slip plate, sets LaRue
handguards apart from the competition. Once properly installed, there is no
chance of movement whatsoever. The side and bottom rails are tucked closer to
the barrel, keeping the profile narrower and more streamlined. LaRue handguards
also include integral QD sling-swivel sockets at the base of each side for
convenient mounting 2-point slings. Additionally, our Free-float Rail system
provides an excellent heat-sinking feature that pulls throat-damaging heat away
from the chamber area. Another heat-sinking benefit is the elimination of
pressure-spikes, which some feel is the cause of a large part of pre-mature bolt
failures.
Weight: .912lb
LaRue Tactical 13.2 Handguard LT15-13.2
Ideal for 16"-20" barreled uppers that need maximum rail space. The 13.2's
length covers all gas blocks, including full-lengths, providing true free-float.
Our two-pin proprietary barrel nut system with its locking anti-slip plate, sets
LaRue handguards apart from the competition. Once properly installed, there is
no chance of movement whatsoever. The side and bottom rails are tucked closer to
the barrel, keeping the profile narrower and more streamlined. LaRue handguards
also include integral QD sling-swivel sockets at the base of each side for
convenient mounting 2-point slings. Additionally, our Free-float Rail system
provides an excellent heat-sinking feature that pulls throat-damaging heat away
from the chamber area. Another heat-sinking benefit is the elimination of
pressure-spikes, which some feel is the cause of a large part of pre-mature bolt
failures.
Weight: 1.132lb


LaRue Quad Rail Free-Floating Handguard with LaRue Locking System.
Comes complete with Allen wrench, vial of blue Locktite and Instructions.

LaRue Tactical 7.0" Handguard LT15-7
Ideal for a replacement for carbine-length rifles using standard front sight bases. The 7.0's length stops just short of a carbine-length gas block, providing true free-float. Our two-pin proprietary barrel nut system with its locking anti-slip plate, sets LaRue handguards apart from the competition. Once properly installed, there is no chance of movement whatsoever. The side and bottom rails are tucked closer to the barrel, keeping the profile narrower and more streamlined. LaRue handguards also include integral QD sling-swivel sockets at the base of each side for convenient mounting 2-point slings. Additionally, our Free-float Rail system provides an excellent heat-sinking feature that pulls throat-damaging heat away from the chamber area. Another heat-sinking benefit is the elimination of pressure-spikes, which some feel is the cause of a large part of pre-mature bolt failures.
Weight: .742 lb
LaRue Tactical 9.0" Handguard LT15-9
Excellent choice for short rifles in the 10"-16" range. The 9.0's length stops just past a carbine-length gas block, providing true free-float. Our two-pin proprietary barrel nut system with its locking anti-slip plate, sets LaRue handguards apart from the competition. Once properly installed, there is no chance of movement whatsoever. The side and bottom rails are tucked closer to the barrel, keeping the profile narrower and more streamlined. LaRue handguards also include integral QD sling-swivel sockets at the base of each side for convenient mounting 2-point slings. Additionally, our Free-float Rail system provides an excellent heat-sinking feature that pulls throat-damaging heat away from the chamber area. Another heat-sinking benefit is the elimination of pressure-spikes, which some feel is the cause of a large part of pre-mature bolt failures.
Weight: .854lb
LaRue Tactical 10" Handguard LT15-10
Ideal for carbine-length rifles in the 11.5 to 16" range. The 10.0's length stops about an inch past of a carbine-length gas block, providing true free-float. Our two-pin proprietary barrel nut system with its locking anti-slip plate, sets LaRue handguards apart from the competition. Once properly installed, there is no chance of movement whatsoever. The side and bottom rails are tucked closer to the barrel, keeping the profile narrower and more streamlined. LaRue handguards also include integral QD sling-swivel sockets at the base of each side for convenient mounting 2-point slings. Additionally, our Free-float Rail system provides an excellent heat-sinking feature that pulls throat-damaging heat away from the chamber area. Another heat-sinking benefit is the elimination of pressure-spikes, which some feel is the cause of a large part of pre-mature bolt failures.
Weight: .92lb
LaRue Tactical 11" Handguard LT15-11FL
Ideal for rifles in the 16" range. The 11.0's length stops just past mid-length gas blocks providing true free-float. Our two-pin proprietary barrel nut system with its locking anti-slip plate, sets LaRue handguards apart from the competition. Once properly installed, there is no chance of movement whatsoever. The side and bottom rails are tucked closer to the barrel, keeping the profile narrower and more streamlined. LaRue handguards also include integral QD sling-swivel sockets at the base of each side for convenient mounting 2-point slings. Additionally, our Free-float Rail system provides an excellent heat-sinking feature that pulls throat-damaging heat away from the chamber area. Another heat-sinking benefit is the elimination of pressure-spikes, which some feel is the cause of a large part of pre-mature bolt failures. Note: Max clearance inside the handguard is 1.15". Any gas block that has a diameter larger than 1.15" will not fit in the handguard. The gas tube port on the gas block is not a factor in clearance.
Weight: .992lb
LaRue Tactical 11" Handguard SBRS (Gooseneck) LT15-11
Developed to accommodate more upper rail-space over 10.5" to 12" barrels, while still providing access to special flash hiders and silencers under 1.25" in diameter. This is the only rail that allows the proper placement of Aimpoint M2, PEQ-2A and front flip-up sight over a 10.5" barrel. The side and bottom rails cover carbine-length gas blocks, and provide true free-float. Our two-pin proprietary barrel nut system with its locking anti-slip plate, sets LaRue handguards apart from the competition. Once properly installed, there is no chance of movement whatsoever. The side and bottom rails are tucked closer to the barrel, keeping the profile narrower and more streamlined. LaRue handguards also include integral QD sling-swivel sockets at the base of each side for convenient mounting 2-point slings. Additionally, our Free-float Rail system provides an excellent heat-sinking feature that pulls throat-damaging heat away from the chamber area. Another heat-sinking benefit is the elimination of pressure-spikes, which some feel is the cause of a large part of pre-mature bolt failures.
Weight: .912lb
LaRue Tactical 13.2 Handguard LT15-13.2
Ideal for 16"-20" barreled uppers that need maximum rail space. The 13.2's length covers all gas blocks, including full-lengths, providing true free-float. Our two-pin proprietary barrel nut system with its locking anti-slip plate, sets LaRue handguards apart from the competition. Once properly installed, there is no chance of movement whatsoever. The side and bottom rails are tucked closer to the barrel, keeping the profile narrower and more streamlined. LaRue handguards also include integral QD sling-swivel sockets at the base of each side for convenient mounting 2-point slings. Additionally, our Free-float Rail system provides an excellent heat-sinking feature that pulls throat-damaging heat away from the chamber area. Another heat-sinking benefit is the elimination of pressure-spikes, which some feel is the cause of a large part of pre-mature bolt failures.
Weight: 1.132lb
HANDGUARD ASSEMBLY INSTRUCTION
WARNING! MAKE SURE YOUR FIREARM IS UNLOADED COMPLETELY WITH NO ROUNDS IN THE CHAMBER AND NO MAGAZINE INSERTED. THE WEAPON SHOULD BE SAFE AT ALLTIMES.
Installation of the LaRue® free-float rail system
Please Supply these instructions to your professional Gunsmith
Handguard Rail
Handguard Nut
Barrel Nut
Spacer
Keeper(anti-rotation device)
8-32 x .80 SHCS 2ea.
Vial of Blue LocTite®
Uncle Mike’s® Sling compatible Swivel insert
Tool Requirements
· Armorer’s wrench · Action Block · Punch Set · Moly Grease · 9/64 L Hex wrench · Strap Wrench
1. Remove the upper from the rifle. Remove the Handguard. Remove the muzzle device. Remove the front sight base. Unscrew and remove the factory barrel nut and delta ring assembly (you won’t need these)
Note: On certain Action Blocks, it May be necessary to Dremel® out an area to accommodate the “Keeper” during installation
2. Next, Place the “Keeper” on the upper receiver, slip on the “Handguard Nut”, then the “Barrel Nut”
3. Add a small amount of Moly Grease to the receiver threads. The “Barrel Nut” is installed just like any other; you snug it up three times, then torque it until the next gas tube hole aligns correctly
4. Install the Spacer.
5. Slip on the float tube and tighten the “Handguard nut”. The tube will align itself with locating pins already in the float tube. Use a strap wrench to get the Handguard Nut” tight.